CBR 600 RR - Programming Extra Keys – HISS
The following is my detailed guide to programming a spare key for an 07-08 CBR600RR. Please note this guide is only going to help if you have one working key.
To add additional keys to your bike, you have two basic options:
- Go to a locksmith purchase a replacement key with a transponder chip and have them pair it with your bike. The quote I got for this was around $200. The locksmith also needs physical access to your bike. If you have no wrench or soldering skills, this will be your best option.
- Buy a key blank and a transponder chip. Get the key cut from your original. Build a simple tool to allow you to pair the additional key to the bike.
What Do I Need?
You will need to build your own H.I.S.S key programming tool. This tool is connected from the battery to the crank position sensor ECU input. The tool can be used to diagnose H.I.S.S errors and more importantly, add new keys.
To get the job done you're going to need:
- Motorcycle Blank Transponder Key Shell For CBR600 – $6
- ID-46 Transponder Chip – Buy a couple (very easy to loose) – $ 11.89
- 2x 26mm Aligator Clips – $1.50
- 3AG Inline Fuse Holder – $1.75
- 3AG 150MA Fuse – $0.80
- 1m of 12mm red wire – $0.25
- 1m of 12mm black wire – $0.25
- Mini Female Spade Connectors – $2.85
- 100 OHM 1 Watt 5% Resistor – $0.48
You're also going to need a soldering iron, some electrical insulation tape and a set of metric hex keys to remove fairings from the bike. A multimeter is also handy for confirming your leads work, and you have used the correct value resistor.
For a total of $25, you can add a new key to your bike v.s. shelling out $200.
Building the HISS Programming Tool
To build the tool, you need to create the two cables shown below. The wires I made are both a meter long, more than enough to make it from the battery to the crank position sensor plug.
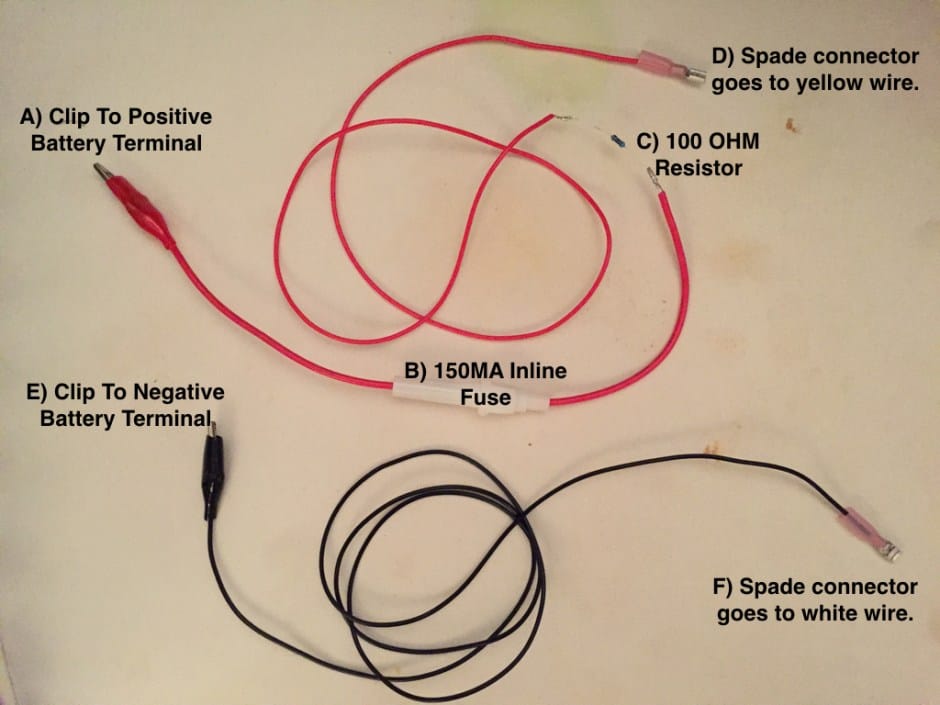
Couple of things to bear in mind.
Your positive wire will end up being a lot longer than your negative wire because you added an inline fuse holder and the resistor. Remember to trim it to the same size before you add the final connector.
You should insulate the resistor, the best way to do this is with heat shrink tubing if you don't have any just wrap it in electrical tape.
I have never found any explanation on how the 100 OHM resistor value was arrived at. The value comes from the forums listed in the links section, none of these sources seems to have disassembled a Honda tool.
I arrived at the 150 MA fuse value by calculating the maximum current that should flow given the resistor. Using (V/R = I) with the values 12.6v / 100 OHM = .126A which is 126 MA. I assume if the draw is larger than this, we have a short.
Locating the Crank Position Sensor Connector
On the 07-08 CBR600RR the connector you need to access is hidden underneath the tank on the right side of the bike. The only way I could access it was to prop the tank up to create some space to get my hand in.
If you have race fairings, you need to remove the tail section, tank cover, upper fairing and lower. The tank is raised by removing hex bolts on either side. Next, you need to prop the tank up on something to access underneath. I used what was handy, two large T-shaped hex keys, alternatively a block of wood will also work.
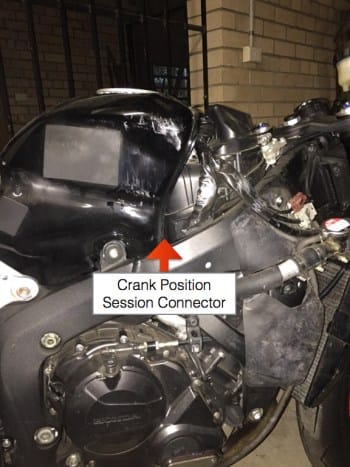
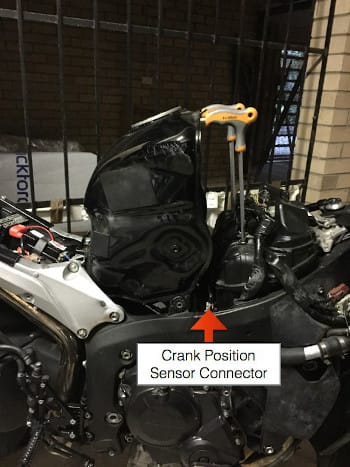
Find the connector and unclip it from the metal tab attaching it to the bike. Use a small flathead screwdriver to separate the male from the female; it's best not to pull on the wire.
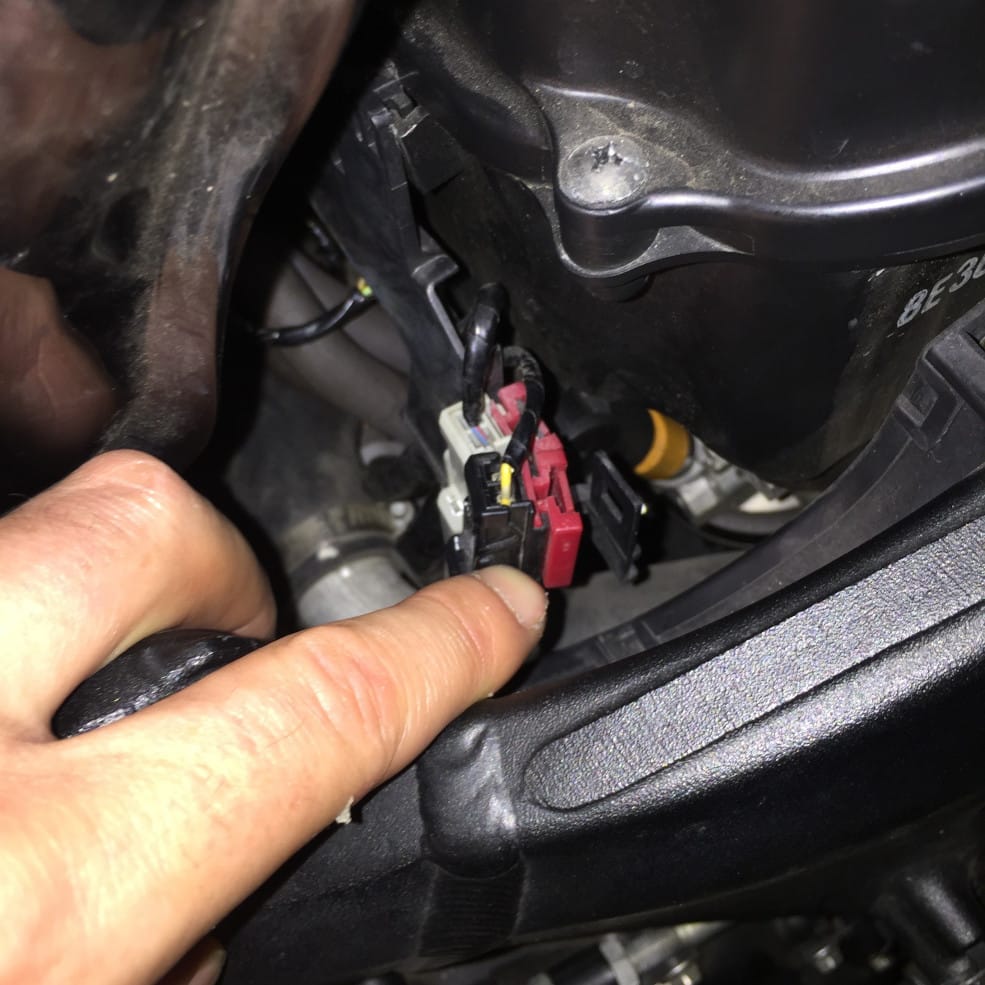
Now you need to wrap the ends of both spade connectors in electrical tape. The connectors will be extremely close to each other when inserted. Connect the red cable to the yellow wire and connect the black cable to the white wire.
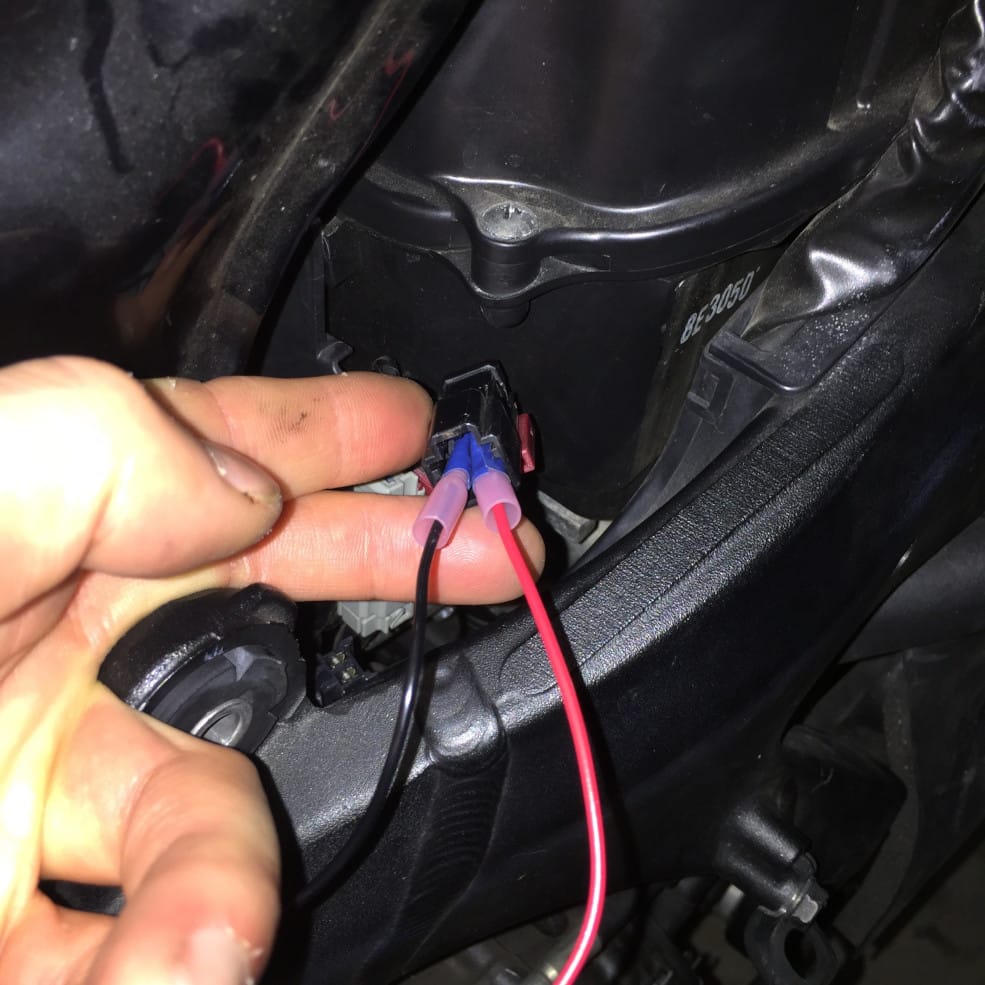
Programming a new key
- Clip the black cable to the negative terminal on your battery.
- Clip the red cable to the positive terminal on your battery.
- Insert your working key and turn the ignition on. The H.I.S.S light should stay on i.e. not flash. The fuel rail should not prime.
- Unclip the red cable. Count to four and then reconnect it to the battery. The H.I.S.S light should emit four short flashes.
- Remove the original key and put it a couple of centimetres away from the ignition barrel.
- Put your new key in and turn the ignition on. The H.I.S.S light should again emit four short flashes.
- Switch the ignition off.
- Disconnect the red cable from the battery.
- Test your keys. Turn the ignition on making sure the kill switch is in the off position. If the key is recognised, the fuel pump will prime. I never wanted to find out what happens if you start the bike with the crank position sensor disconnected.
- Reconnect the crank position indicator and put the bike back together.
Diagnosing Problems
The following are some of the problems I encountered doing this.
The H.I.S.S light doesn't stay lit (step 3)
One of your cables is not correctly connected. Most likely the spade connectors and not making good contact with the pins. Reposition the spade connectors and try again.
The H.I.S.S light doesn't flash four times registering my new key
If you get a short, long and two short flashes, something is wrong with the transponder. I had this problem with the first transponder I purchased online. The fault code indicates that the transponder was already used with another ECU. To resolve this, I tried a different chip supplier and bought a couple of extras just in case.
All of the information above comes from the sources listed below:
HISS Information for 1999 CBR600F (pdf)
XL700V_Service_part21-Immobilizer (pdf)
http://www.600rr.net/vb/17-03-06-rr-modifications/459562-2006-cbr600rr-hiss-key-registration.html
http://www.team-bhp.com/forum/superbikes-imports/145900-diy-honda-hiss-key-programming.html